Really annoying to get "There was an error while gathering this information" on System profiler, after hours looking through internet, several try and noresult, finally get it fixed, here is the step.
remove :
/System/Library/SystemProfiler/ SPPlatformReporter.spreporter
/System/Library/SystemProfiler/ SPiPlatformReporter.spreporter
get from any MacOSX DVD installation using pacifist the original for those file above, copy them from DVD to above directory, remove /System/Library/Extensions.mkext and reboot. it should get it fixed.
I got this instructions from this link, but instead using 10.4.10 DVD (as it said on that page instructions), I am using any DVD that available on my shack, and found iatkos 10.5.4, currently I am running 10.5.8 system, installed through ideneb 1.5.1.
side note : you need to have this SMBIOSEnabler.kext installed on your system too, and edit the contents of /System/Library/Extensions/SMBIOSEnabler.kext/Contents/Info.plist to reflect your system info.
Sunday, November 28, 2010
Saturday, November 27, 2010
Nvidia XFX GF 9400GT 550M 512MB on 10.5.8 osx
I can confirm that XFX GF 9400GT PCI-E card (Product Code: PV-T94G-YAK2) can run on OSX 10.5.8 (with ideneb 10.5.1) installation (then do the combo upgrade from mac website) with full QE/CI support.

things you need are :
nVidia Driver from this link or this link.
osX86Tools
edit com.apple.Boot.plist under /Library/Preferences/SystemConfiguration/
here is procedure to edit that com.apple.Boot.plist
1. Open osX86Tools.
2. Click on Add EFI Strings/Boot Flag and open it
3. now do these steps:
4. Click GFX String [On upper Left]
5. On Graphics Card, Drop down the list and choose Custom Geforce [should be at very last]
6. On the box Type 'nVidia Geforce 9400 GT'
7. Select 512MB as cards Memory and click OK
8. Select VGA / DVI-I as display output configuration (NVCAP) note : this one need to be correct, I tried the DVI-I / VGA before, and it didnt work.
9. Copy Hexadecimal EFI String box contents and paste it to previous OSx86Tools windows called Boot Editor on the box above "Apply Changes to com.apple.Boot.Plist button.
10. close all and then restart the machine, your screen will now ready and good to go like mine, as you see on the snapshot above, its feed 24 inch screen with 1920x1200 resolution, nice...
other link to read, the same nvidia 9400 chipset video card but different brand.
Tuesday, November 16, 2010
What is the Windows 7 edition that is best for me ?
Saturday, August 21, 2010
Linux USB Drive boot problem
Universal-USB-Installer.exe from http://www.pendrivelinux.com is great tool to make any linux boot on USB flash drive, but one weird thing happened to me, I bought couple 4Gb USB flash, none of them work and giving this Syslinux load error :
No Default or UI Configuration Directive found!...
but when I use my smaller flash drive (ie 1Gb and 512Mb) it work just fine.
figured out for a while, typed this on the prompt below that error message :
grub# vmlinuz initrd=initrd.gz pmedia=cd
with that line typed after the error, my usb boot work just fine, then I checked what files are inside my flash drive, I found there is no syslinux.cfg, only isolinux.cfg, so I renamed the file to syslinux.cfg, and bam, every time I rebooted the machine, it work without any intervention.
I know since long time ago, isolinux.cfg is for CD boot, and for HDD boot, it use syslinux.cfg, but not sure why my 1Gb and 512Mb flash drive able to boot its linux kernel with isolinux.cfg.
anyway, just change isolinux.cfg to syslinux.cfg, and it will take care the problem.
Saturday, July 3, 2010
openvpn simple command
here is two simple command to have openvpn tunnel up between server and client on linux system
on server :
/usr/local/sbin/openvpn --port PORT --proto udp --dev tun0 --bcast-buffers 512 --fast-io --ifconfig 192.168.20.1 192.168.20.2 --comp-lzo --comp-noadapt --daemon --route some_net its_masking 192.168.20.2 --keepalive 30 90
on client :
/usr/local/sbin/openvpn --remote SERVERADDR --port PORT --proto udp --dev tun0 --bcast-buffers 512 --fast-io --comp-lzo --comp-noadapt --daemon --ifconfig 192.168.20.2 192.168.20.1 --keepalive 30 90 --float
Monday, June 7, 2010
Audiocodes Hunt Group routing table and its Routing Manipulation
After configuring audiocodes to work with asterisk, one thing need to be done properly, to make audiocodes just route the ip call to PSTN the way asterisk want it.
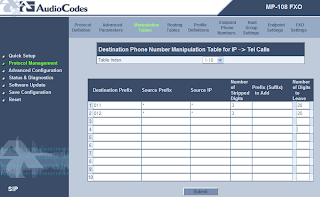
on my case here, I have my asterisk adding prefix 011 and 012 before sending it to any FXO gateway attached to my asterisk, the problem is audiocodes by default will use hunting system and use any available FXO to make a call, which I dont want it to be happen as every port is attached to different provider and I want the call to be routed properly to save the cost (and cost calculation is done on asterisk).
two configurations need to be done on audiocodes for this case :
1. Protocol Management -> Manipulation Tables -> IP Tel Destination Numbers, below is the screen shot.

2. Protocol Management -> Routing Tables -> IP to Hunt Group routing, below is the screen shot.

by looking at both screen shot above, we will get the idea easily.
on my case here, I have my asterisk adding prefix 011 and 012 before sending it to any FXO gateway attached to my asterisk, the problem is audiocodes by default will use hunting system and use any available FXO to make a call, which I dont want it to be happen as every port is attached to different provider and I want the call to be routed properly to save the cost (and cost calculation is done on asterisk).
two configurations need to be done on audiocodes for this case :
1. Protocol Management -> Manipulation Tables -> IP Tel Destination Numbers, below is the screen shot.

2. Protocol Management -> Routing Tables -> IP to Hunt Group routing, below is the screen shot.

by looking at both screen shot above, we will get the idea easily.
Tuesday, June 1, 2010
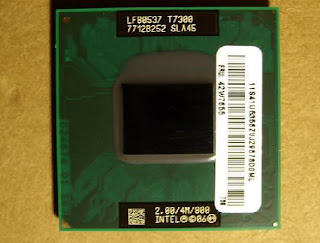
Intel T7300 on Sony Vaio VGN-NR220E
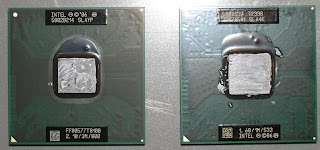
This is another upgrade for my 2 years old Sony Vaio VGN-NR220E. As previous project done to this low cost laptop (I got it for only US$ 320, on BestBuy sale) that changed it from Windows Vista to Windows XP and then to MacOSX Leopard 10.5.2, everything was fine except the horse power that come with this laptop, Intel T2330, is not really a horse power, more like mule power :D.
Last week, I look for the replacement of its processor, I was looking for T8100 processor initially, as other guy do the upgrade on this laptop with success ( this link ), but after looking around at ebay, this processor is still damn expensive, even used one, the price never below US$80.
Well, then I had to lower my expectations, I only need faster processor, bigger cache, and most important thing, can do virtualization, so T7300 is my next choice, if this laptop can do T8100, so it should be able to do T7300.
finally after 2 weeks restless bidding on ebay, got a bargain price at US$48, it used one but come with 30 days warranty, not bad at all.
now I am a happy user, my MacOSX Sony Vaio is run faster then before, I completely migrated my XP to run under MacOSX with Virtual machine that utilize its intel VT-x hardware virtualization, sweet.......
below pictures are for comparison of the core size between T2330, T8100 and T7300.


Monday, May 31, 2010
Disable copy and paste into form text field
People sometimes got lazy just to enter information such thing like this below :
your email :
confirm your email :
the second question to confirm your email address, or to be exact, to retype again the email address is having a purpose to minimize the typo or any other problem like incorrect email address, or by mistake, entering another person email address.
but because of laziness, many times for second question, people just do copy and paste, ctrl-c and ctrl-v to that column, so at this point, the purpose of having second question is no longer valid anymore.
to prevent such behaviour, here is simple trick on the HTML form.
<input type="text" class="medium" name="contactEmail2" id="contactEmail2" onCopy="return false" onDrag="return false" onDrop="return false" onPaste="return false" tabindex="23"/>
with that addition, people are no longer able to do paste/ctrl-v into it.
Monday, May 24, 2010
Put ipv6 configuration on linux
I always need this once a while and always forgot it, so this is my note on ipv6 for linux (Fedora flavor of course :) ).
/sbin/vconfig add eth0 600
/sbin/ifconfig eth0.600 up
/sbin/ifconfig eth0.600 inet6 add 2001:AA00:F:F::2/64
/sbin/route -A inet6 add ::/0 gw  2001:AA00:f:f::1
Sunday, March 7, 2010
Patch Asterisk 1.4 to work with MagicJack.
I know, its against MagicJack TOS but I have to do this because that small MJack USB phone adapter is hot, I really dont like to have it that way while attached in my laptop.
once MagicJack guys can fix that issue, I will back again to use that phone adapter, here is the suggestion for you guys, put some power management control on that adapter, and just enabled the rest of device (that make it hot) only when there is a call placed, seems simple ha ? yes it is dude.
and why I bother to use MagicJack with Asterisk and not using any SIP Adapter directly ?, because I dont know how to configure SIP adapter to work with MagicJack server .. :D
here is the step (I use Asterisk 1.4.24, not sure if this work on 1.6).
1. go to asterisk source, on this directory ../asterisk-1.4.24/channels
2. download chan_sip patch
3. patch -l chan_sip.c < mjack_patch_chan_sip.patch
4. rm chan_sip.o chan_sip.so
5. cd ..
6. make
7. cp channels/chan_sip.so /usr/lib/asterisk/modules/chan_sip.so
8. start asterisk /usr/sbin/asterisk -Fvvvvvvvvvv
9. have fun.
Subscribe to:
Comments (Atom)

